Home Made Cupcake

Minggu, 11 September 2011

amaretti

Posted By: Rynisma - 18.27
i almost always have egg whites left over when i make ice cream. and since i'm not a fan of meringue and a girl can only eat so many scrambled egg whites, i've been on a mission this summer to find uses for whites. and these amaretti are perfect light clouds of almond goodness. yes, i was slightly afraid they would be more like meringues, but good news (for me, anyway) is that the almonds add just enough texture. and the crackly tops are the best part. be sure to eat a few right after they come out of the oven, when the bottom is perfectly chewy and hasn't had a time to cool and get crunchy. perfect.


what else can i do with my whites? yes, i know i can freeze them. every time i do, i forget they're in the freezer, only to find them a few months later when i'm cleaning out the freezer. not a pretty sight, and completely ruined.

amaretti
adapted from ready for dessert
30 minutes, makes 36 two inch cookies

1 1/2 cups almonds, toasted
1 1/2 teaspoons all purpose flour
3/4 cup confectioners sugar
3 egg whites, room temperature
9 tablespoons granulated sugar
1 teaspoon almond extract
  1. preheat your oven to 300F and line two baking sheets with parchment paper or silicone mats. don't skip this as the cookies will stick like glue to your baking sheets. position the racks in the upper and bottom thirds of your oven.
  2. pulse the almonds, flour, and confectioners sugar in a food processor until the almonds are finely ground, about ten times.
  3. in a separate bowl, whisk the egg whites to soft peaks. while whisking, add the sugar a tablespoon at a time, until combined. continue whisking until shiny, stiff peaks are formed.
  4. using a spatula, fold one third of the almond mixture into the eggs, being careful not to deflate the whites. repeat with the other two thirds of the almond mixture. fold in the almond extract last. 
  5. use a pastry bag to pipe mounds of batter onto the baking sheets in whatever size you like, spacing them about three quarters of an inch apart. if you don't have a pastry bag, transfer the mixture to a quart size zip top bag. zip the top and snip one corner to pipe the batter onto the baking sheets.
  6. bake the cookies for ten minutes, rotate and move to the other rack, and bake an additional ten minutes or until lightly browned. turn off the oven and leave the cookies in for another twenty minutes.
  7. transfer cookies to a wire rack to cool completely. store in an airtight container.

Minggu, 04 September 2011

quick chunky pasta sauce

Posted By: Rynisma - 20.30
below is the third fourth installment from jason, my taste tester, who has decided cooking isn't really too hard. he has occasional food projects, just like me, that he wants to share too. (check out his stovetop mac & cheese and egg sandwich experiment too.) this time it's today's lunch - a quick pasta sauce full of fresh vegetables.
Summer is great for food because you can always find fresh ingredients at the local farmers' market or your own garden. Sometimes you bought (or harvested) a lot of great vegtables and don't know what to do with them. With no meal planned on a lazy Saturday afternoon, we were getting very hungry and needed something fast. I made a fresh pasta sauce from the tons of fresh vegtables in the house.

I've watched Kate make sauce before many times. I was in a hurry and didn't want to spend forever searching the Internet for a recipe. So I just totally winged it. And you know what? It turned out better than I thought it would!

I was afraid that I would guess wrong at the times and order of cooking the vegetables, but I think it came out quite good -- Kate seemed to think it was pretty much perfect. What I write here is exactly how I did it; I didn't use a timer, just my intuition, but below I note what cues I use. Another note is that the sauce is chunky because I didn't try to blend it. If you like a smooth sauce, this would probably blend well. I've also heard that sugar is a popular sauce addition to counteract the acidity of the tomatoes, but I've never felt the need to do that; feel free to experiment. Kate also suggested adding butter at the end of the recipe to the sauce to make it thicker and richer.

Don't be afraid of a fresh sauce! Anyone can make this recipe and "skip the jar" of sauce with who-knows-what fillers in it.

quick chunky pasta sauce
30 minutes, serves 2

small warning: while the flavors of this sauce are amazing, it is just wet enough to coat your noodles. don't expect them to be drowning like they are with jarred tomato sauce.

2 large, fresh and ripe garden tomatoes, diced
2 cloves garlic, minced
1 carrot, finely diced
1 onion, finely diced
2 tablespoons olive oil
2 handfuls of fresh market mushrooms, diced
0.5 lbs pasta
tablespoon of butter or margarine
Salt

  1. Get your ingredients ready beforehand: dice the tomatoes, carrots and onion. The tomatoes and mushrooms can be diced large (about 0.5 inch or 1.5cm cubes), because they will break down. The onions and carrots should be diced much smaller than that, about half the size, so that they get soft. Mince the garlic.
  2. Start heating a pot of salted water to boil. I saw on Anne Burrell's show on Food Network that properly salted water for cooking pasta should taste "like the ocean."
  3. Heat 2 tablespoons of olive oil in a sauce pan on medium heat, enough to get a good coating and flavor your sauce. If the oil starts to smoke, it's too hot!
  4. Add the minced garlic in the pan. If your pan is hot enough it will sizzle right away. Cook until you can smell the garlic, it may be only 30-60 seconds. Don't let it brown; overcooked garlic tastes very bitter.
  5. Add the carrots and onion and cook until they are getting soft. The onion will start to turn translucent. If you see the onions start to get brown and carmelize, it's too long.
  6. Add the tomatoes and mushrooms. Keep a vigorous simmer going at medium to medium-low heat. The tomatoes and mushrooms will start to breakdown and give off their water, which will reduce as you cook. Cook for about 10 minutes. When the liquid has mostly disappeared, turn off the heat. Don't let the sauce go dry, which will start to burn it.
  7. Cook the pasta while the sauce is simmering and reducing.
  8. When the sauce has reduced, add heavy pinch of salt and taste. Don't skip tasting! Add more or less salt to taste, keeping in mind you can add salt but not remove it.
  9. When the pasta is done, I love to add about a tablespoon of butter or margarine to keep it from sticking but also giving it great flavor.
  10. Serve the sauce over the pasta and enjoy!

Kamis, 01 September 2011

caprese eggs on toast

Posted By: Rynisma - 17.00
one food jason and i don't agree on are eggs. his are always cooked to death - not even a hint that the yolk might run or be the slight bit soft - mine are cooked just enough so the whites are set. which could be a pain in the you-know-what, forcing us to retire eggs from the dinner and breakfast rotation. luckily it hasn't happened yet.

this time eggs are paired perfectly with fresh garlicky tomatoes, melty mozzarella, a gooey poached egg (for me and a hard poached egg for jason) and fresh pesto. topped above a piece of italian bread, it's the perfect bite. and even though these made a weeknight dinner appearance for us, this would be an amazing weekend breakfast or lunch.

 
caprese eggs on toast
30 minutes, makes 4 eggs on toast, which served two of us

4 slices italian bread
1 pint cherry tomatoes
2 cloves garlic, minced
1/2 pound fresh mozzarella, sliced
4 eggs
2 tablespoons pesto (or more, depending on how much you love the stuff)
  1. coat the bottom of a saute pan with olive oil and heat over medium-low. halve the tomatoes and add them to the pan along with the garlic. saute slowly just until the tomatoes start to break down, about 10 minutes.
  2. while the tomatoes are cooking, toast your bread and cook the eggs to your liking. if the tomatoes are finished before your eggs, turn off the heat and cover them to keep warm.
  3. layer the cheese, tomatoes, and eggs on the toast. top each egg with pesto.

Senin, 29 Agustus 2011

beer battered green beans with spicy dipping sauce

Posted By: Rynisma - 19.07
the last few times i've been to the distillery, i've had their crispy green beans - green beans perfectly fried with a buffalo ranch dipping sauce. since green beans are now competing with cucumbers for the top spot in my garden and i finally have the courage to try frying something again (let's just say i had a batch of homemade donuts that did not end well), i turned about a pound of them into the perfect salty spicy snack.


first time frying? it really isn't as intimidating as it looks. the problem with my miserable donuts is that i was cooking them on an electric cooktop, and a crummy one at that. that means as soon as the cool donut hit the oil and the temperature dropped, the cooktop couldn't respond quickly enough (like gas can) to turn the heat up a bit. with a gas stove, as soon as the oil temp drops or is too high, the flame instantly changes the temperature. this control is really critical to frying something well. now if you're fancy and have a fryer, you're all set.


spicy dipping sauce
adapted from every "outback steakhouse bloomin onion dip" knockoff recipe i found online
5 minutes, makes about 1/2 cup, plenty for 3/4 pound of beans

1/2 cup mayonnaise
2 teaspoons ketchup
1/4 teaspoon paprika
1/8 teaspoon garlic powder
1/8 teaspoon dried oregano
hot pepper sauce
  1. mix everything but the hot sauce together. season with salt and pepper. 
  2. add the hot sauce a few dashes at a time, stirring and tasting after each addition until it's the level of spiciness that you want.
  3. refrigerate leftovers.

beer battered green beans
adapted from the neelys
makes 1/2 to 3/4 pound (serves 4 as an appetizer), 30 minutes

1/2 to 3/4 pound fresh green beans, ends trimmed, washed, and dried
1/2 cup all purpose flour
1/2 cup beer
1 teaspoon salt
a healthy dose of freshly ground black pepper
a few cups of vegetable, corn, or peanut oil, for frying
  1. start with the oil as the beans can be prepped while it's heating up. pour about 2 inches of oil into the bottom of a dutch oven or other heavy bottom pot. place over medium to medium high heat and heat until the temperature reaches 375F.
  2. prep your beans and the batter while the oil is heating. in a large bowl or square container with high sides (i used my 8x8 pyrex baker), whisk the flour, beer, salt, and pepper together. toss with the beans. 
  3. prep your fried bean station. place a cooling rack on top of a sheet tray or piece of parchment paper on the counter. this will make clean up a whole lot easier and you don't have to mess around with paper towels.
  4. when the oil has reached 375F, drop about six or eight beans in one at a time, placing them carefully so they don't touch and cook stuck together. after 15 to 20 seconds, use a metal mesh spider to push the beans around a bit, making sure they aren't stuck to the bottom of the pan. cook until golden brown. remove from the oil and place on the cooling rack. sprinkle lightly with salt. check to make sure your oil has come back up to temperature before placing the next batch in. if your oil isn't hot enough, the beans will soak up the oil and be really greasy. 
  5. let cool for a few minutes before dipping.

Jumat, 26 Agustus 2011

refrigerator garlic dill pickles

Posted By: Rynisma - 20.10
a few years ago, i made a mistake with zucchini. it was the first summer in our house and i was excited to have my own space to grow whatever i wanted. a quarter of the space was dedicated to six zucchini plants. yes, six. i spent the second half of the summer trying to give away zucchini faster than they were growing. i vowed never to plant so many again. that same year, my cucumbers did absolutely nothing.


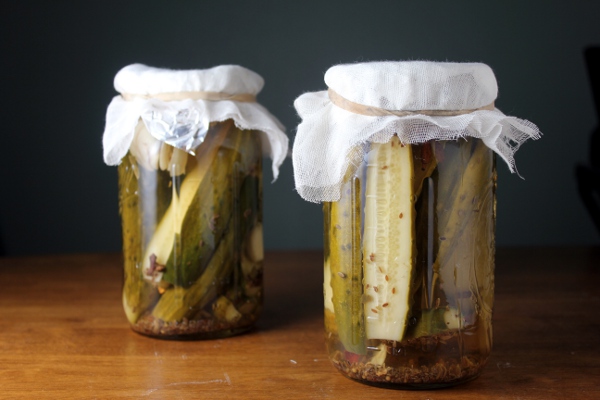
in years since, i've significantly reduced my zucchini plants to a mere two and dedicated the rest of the zucchini plot to cucumbers. and i got smart and decided to grow them up a metal fence. so far this summer i've had only one sad and lonely zucchini and can't keep up with the cucumbers! so if your garden is being taken over by them - or you see a bunch at the market for $1 - these pickles are exactly what they claim to be: perfectly spicy, perfectly garlicy, and crunchy. finally, a homemade garlic dill that isn't floppy and lifeless! ...and tastes remarkably similar to garlic dills in the refrigerated section at your grocery store.

wanna impress your friends? whip up a batch the weekend - or a couple days - before your labor day barbecue. perfect with a grilled burger and other end of the summer picnic fare.

garlic dills not your thing? try these quick refrigerator bread & butter pickles

refrigerator garlic dill pickles
adapted from foodie with family
30 min active, makes 2 quarts

8 to 10 small to medium pickling cucumbers
1 tablespoon dill seed
1 1/2 teaspoons pickling spice
4 cups cold water
1/4 cup apple cider vinegar
2 1/2 tablespoons kosher salt
4 garlic cloves, peeled and lightly smashed
  1. wash cucumbers and trim the blossom end. cut into halves, spears, or whatever size you want your pickles.
  2. divide the cucumbers evenly between two quart mason jars. sprinkle the dill seed and pickling spice over the cucumbers.
  3. in a separate bowl, stir the water, vinegar, and salt together until the salt dissolves. divide the mixture evenly among the two jars. add two garlic cloves to each jar.
  4. make sure the cucumbers are completely submerged in the brine. if not, place a cup, a piece of aluminum foil, or some other object over the top to make sure the cukes are submerged. cover with cheesecloth and leave out on your counter two to four days. start tasting the pickles after 48 hours. they'll get a bit spicier and stronger in flavor the longer they sit. (i stopped one jar at 2 days and one at 4 days.) when they're ready, cap the jars and place in the refrigerator, making sure cukes are still covered with the brine.

Selasa, 23 Agustus 2011

spiced plum butter

Posted By: Rynisma - 14.18
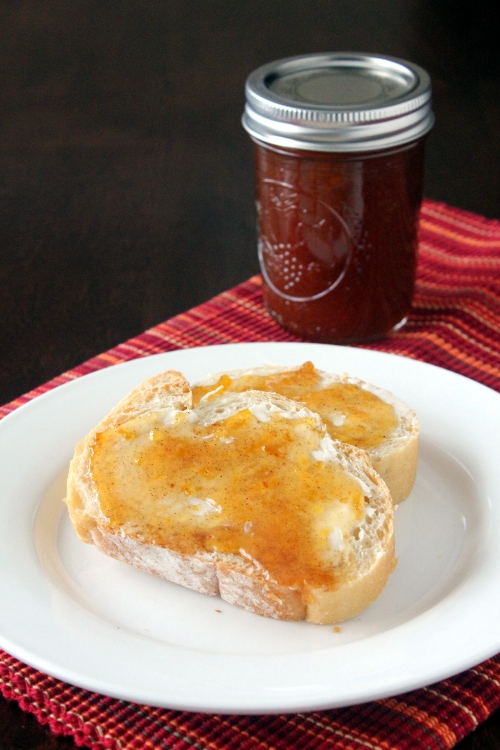
i've been on a canning spree the last couple weekends and i don't see an end in sight! this week at the market i picked up 2 pounds of local yellow plums for $2, and spiced them up with two of my favorite things: cinnamon and cardamom. not sure what cardamom tastes like? if you've had chai tea, chai latte, or anything else "chai" flavored, you've had cardamom. it's a unique flavor, almost floral and herbaceous at the same time, and it pairs really well with the sweet plums.


anybody else think it's outrageous how much spices cost in the grocery store? the best kept secret: indian grocery stores or indian spice stores, if you have them were you live. i stock up my chai spices about once a year and recently stopped in for chili powder and other spices for taco seasoning. the prices are unbelievable! case in point: black peppercorn. last time i was there, i picked up 7 ounces for $2.40. there's no way i could get a normal sized 2 ounce jar in the grocery store for less than that. it's the best.

spiced plum butter
adapted from sugarcrafter
1 hour, makes three pints

2 pounds plums, halved and pitted
1/4 cup water
1 teaspoon cinnamon
1 teaspoon cardamom
2 tablespoons lemon juice
2 1/2 cups granulated sugar
  1. prepare your water bath, jars and lids for canning. ball has a good intro to canning guide on their website if you're new to canning.

  2. pulse the plums in your food processor or blender until smooth. 

  3. in a large saucepan, combine the plums, water, cinnamon, cardamom, lemon juice, and sugar. bring to a boil over medium heat, stirring frequently.

  4. turn the heat down to a simmer. simmer until the mixture thickens to your liking, about 30 to 45 minutes.

  5. ladle hot butter into hot jars, leaving 1/4 inch headspace. place lids and bands on jars and process in a water canned for 15 minutes.

Sabtu, 20 Agustus 2011

caprese omelet with pesto

Posted By: Rynisma - 16.42
every sunday i plan breakfast, lunch, and dinner for the work week to reduce shopping trips and make it easier to answer the "what's for dinner?" question. as consistent as i am about planning weekday meals, the weekend is another story. saturday and sunday lunch are almost always neglected.

lucky for me - and probably you - my tomatoes are perfectly ripe and my basil is out of control. why not fold some perfectly ripe tomatoes (preferably homegrown from the plant your grandpa grew for you from seed) into eggs and top with pesto? it's the perfect mid-day lunch, quick breakfast, or meatless dinner. this one's a keeper for sure.


caprese omelet with pesto
20 minutes, serves one if you're really hungry, two if you're not

2 eggs
splash whole milk or half & half
1/4 to 1/2 cup shredded mozzarella cheese
medium tomato
1/2 cup loosely packed basil
1 garlic clove, peeled
2 tablespoons almonds or pine nuts
about 2 tablespoons olive oil
  1. coat the bottom of a medium skillet with butter or non-stick spray and heat over medium-low heat.

  2. whisk the eggs and milk or half & half together. season well with salt and pepper.

  3. pour the eggs into the preheated pan and cook until cooked through.

  4. while the eggs are cooking, make the pesto. in the bowl of a food processor, add the basil and garlic clove. pulse a couple times until coarsely chopped. add about a tablespoon of olive oil and pulse again. add the nuts and pulse. with the processor running, stream in olive oil until the pesto is at the consistency you like.

  5. when the eggs are just set, remove from heat. add the mozzarella to half, top with the tomatoes, and cover the pan for a few minutes so the cheese melts. fold the omelet in half and serve with the pesto poured on top.

Copyright © 2013 Free Food Recipe 24 Hours™ is a registered trademark.

Designed by Templateism. Hosted on Blogger Platform.