Home Made Cupcake

Senin, 29 Agustus 2011

beer battered green beans with spicy dipping sauce

Posted By: Rynisma - 19.07
the last few times i've been to the distillery, i've had their crispy green beans - green beans perfectly fried with a buffalo ranch dipping sauce. since green beans are now competing with cucumbers for the top spot in my garden and i finally have the courage to try frying something again (let's just say i had a batch of homemade donuts that did not end well), i turned about a pound of them into the perfect salty spicy snack.


first time frying? it really isn't as intimidating as it looks. the problem with my miserable donuts is that i was cooking them on an electric cooktop, and a crummy one at that. that means as soon as the cool donut hit the oil and the temperature dropped, the cooktop couldn't respond quickly enough (like gas can) to turn the heat up a bit. with a gas stove, as soon as the oil temp drops or is too high, the flame instantly changes the temperature. this control is really critical to frying something well. now if you're fancy and have a fryer, you're all set.


spicy dipping sauce
adapted from every "outback steakhouse bloomin onion dip" knockoff recipe i found online
5 minutes, makes about 1/2 cup, plenty for 3/4 pound of beans

1/2 cup mayonnaise
2 teaspoons ketchup
1/4 teaspoon paprika
1/8 teaspoon garlic powder
1/8 teaspoon dried oregano
hot pepper sauce
  1. mix everything but the hot sauce together. season with salt and pepper. 
  2. add the hot sauce a few dashes at a time, stirring and tasting after each addition until it's the level of spiciness that you want.
  3. refrigerate leftovers.

beer battered green beans
adapted from the neelys
makes 1/2 to 3/4 pound (serves 4 as an appetizer), 30 minutes

1/2 to 3/4 pound fresh green beans, ends trimmed, washed, and dried
1/2 cup all purpose flour
1/2 cup beer
1 teaspoon salt
a healthy dose of freshly ground black pepper
a few cups of vegetable, corn, or peanut oil, for frying
  1. start with the oil as the beans can be prepped while it's heating up. pour about 2 inches of oil into the bottom of a dutch oven or other heavy bottom pot. place over medium to medium high heat and heat until the temperature reaches 375F.
  2. prep your beans and the batter while the oil is heating. in a large bowl or square container with high sides (i used my 8x8 pyrex baker), whisk the flour, beer, salt, and pepper together. toss with the beans. 
  3. prep your fried bean station. place a cooling rack on top of a sheet tray or piece of parchment paper on the counter. this will make clean up a whole lot easier and you don't have to mess around with paper towels.
  4. when the oil has reached 375F, drop about six or eight beans in one at a time, placing them carefully so they don't touch and cook stuck together. after 15 to 20 seconds, use a metal mesh spider to push the beans around a bit, making sure they aren't stuck to the bottom of the pan. cook until golden brown. remove from the oil and place on the cooling rack. sprinkle lightly with salt. check to make sure your oil has come back up to temperature before placing the next batch in. if your oil isn't hot enough, the beans will soak up the oil and be really greasy. 
  5. let cool for a few minutes before dipping.

Jumat, 26 Agustus 2011

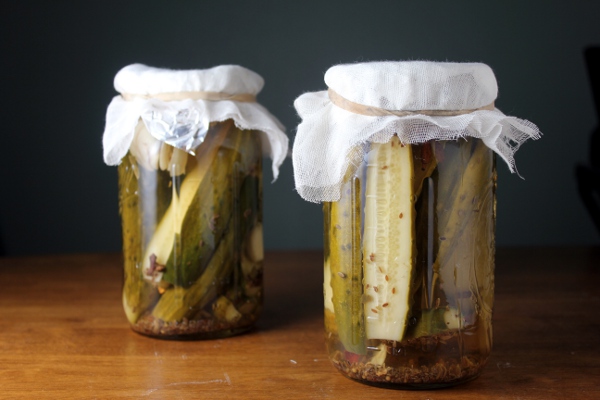
refrigerator garlic dill pickles

Posted By: Rynisma - 20.10
a few years ago, i made a mistake with zucchini. it was the first summer in our house and i was excited to have my own space to grow whatever i wanted. a quarter of the space was dedicated to six zucchini plants. yes, six. i spent the second half of the summer trying to give away zucchini faster than they were growing. i vowed never to plant so many again. that same year, my cucumbers did absolutely nothing.


in years since, i've significantly reduced my zucchini plants to a mere two and dedicated the rest of the zucchini plot to cucumbers. and i got smart and decided to grow them up a metal fence. so far this summer i've had only one sad and lonely zucchini and can't keep up with the cucumbers! so if your garden is being taken over by them - or you see a bunch at the market for $1 - these pickles are exactly what they claim to be: perfectly spicy, perfectly garlicy, and crunchy. finally, a homemade garlic dill that isn't floppy and lifeless! ...and tastes remarkably similar to garlic dills in the refrigerated section at your grocery store.

wanna impress your friends? whip up a batch the weekend - or a couple days - before your labor day barbecue. perfect with a grilled burger and other end of the summer picnic fare.

garlic dills not your thing? try these quick refrigerator bread & butter pickles

refrigerator garlic dill pickles
adapted from foodie with family
30 min active, makes 2 quarts

8 to 10 small to medium pickling cucumbers
1 tablespoon dill seed
1 1/2 teaspoons pickling spice
4 cups cold water
1/4 cup apple cider vinegar
2 1/2 tablespoons kosher salt
4 garlic cloves, peeled and lightly smashed
  1. wash cucumbers and trim the blossom end. cut into halves, spears, or whatever size you want your pickles.
  2. divide the cucumbers evenly between two quart mason jars. sprinkle the dill seed and pickling spice over the cucumbers.
  3. in a separate bowl, stir the water, vinegar, and salt together until the salt dissolves. divide the mixture evenly among the two jars. add two garlic cloves to each jar.
  4. make sure the cucumbers are completely submerged in the brine. if not, place a cup, a piece of aluminum foil, or some other object over the top to make sure the cukes are submerged. cover with cheesecloth and leave out on your counter two to four days. start tasting the pickles after 48 hours. they'll get a bit spicier and stronger in flavor the longer they sit. (i stopped one jar at 2 days and one at 4 days.) when they're ready, cap the jars and place in the refrigerator, making sure cukes are still covered with the brine.

Selasa, 23 Agustus 2011

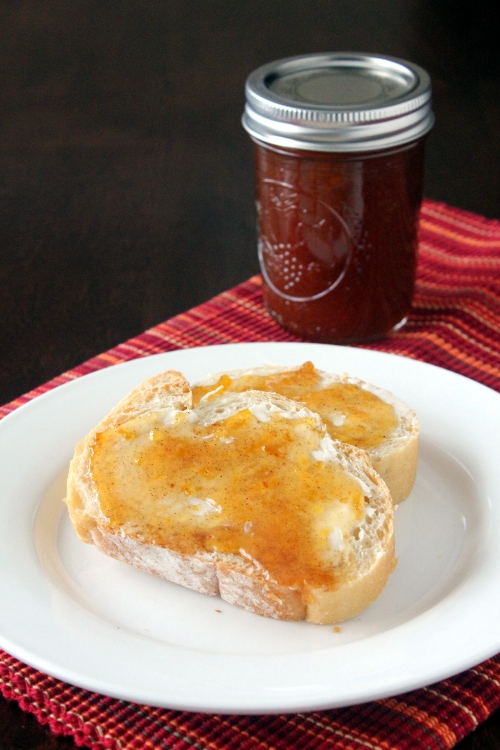
spiced plum butter

Posted By: Rynisma - 14.18
i've been on a canning spree the last couple weekends and i don't see an end in sight! this week at the market i picked up 2 pounds of local yellow plums for $2, and spiced them up with two of my favorite things: cinnamon and cardamom. not sure what cardamom tastes like? if you've had chai tea, chai latte, or anything else "chai" flavored, you've had cardamom. it's a unique flavor, almost floral and herbaceous at the same time, and it pairs really well with the sweet plums.


anybody else think it's outrageous how much spices cost in the grocery store? the best kept secret: indian grocery stores or indian spice stores, if you have them were you live. i stock up my chai spices about once a year and recently stopped in for chili powder and other spices for taco seasoning. the prices are unbelievable! case in point: black peppercorn. last time i was there, i picked up 7 ounces for $2.40. there's no way i could get a normal sized 2 ounce jar in the grocery store for less than that. it's the best.

spiced plum butter
adapted from sugarcrafter
1 hour, makes three pints

2 pounds plums, halved and pitted
1/4 cup water
1 teaspoon cinnamon
1 teaspoon cardamom
2 tablespoons lemon juice
2 1/2 cups granulated sugar
  1. prepare your water bath, jars and lids for canning. ball has a good intro to canning guide on their website if you're new to canning.

  2. pulse the plums in your food processor or blender until smooth. 

  3. in a large saucepan, combine the plums, water, cinnamon, cardamom, lemon juice, and sugar. bring to a boil over medium heat, stirring frequently.

  4. turn the heat down to a simmer. simmer until the mixture thickens to your liking, about 30 to 45 minutes.

  5. ladle hot butter into hot jars, leaving 1/4 inch headspace. place lids and bands on jars and process in a water canned for 15 minutes.

Sabtu, 20 Agustus 2011

caprese omelet with pesto

Posted By: Rynisma - 16.42
every sunday i plan breakfast, lunch, and dinner for the work week to reduce shopping trips and make it easier to answer the "what's for dinner?" question. as consistent as i am about planning weekday meals, the weekend is another story. saturday and sunday lunch are almost always neglected.

lucky for me - and probably you - my tomatoes are perfectly ripe and my basil is out of control. why not fold some perfectly ripe tomatoes (preferably homegrown from the plant your grandpa grew for you from seed) into eggs and top with pesto? it's the perfect mid-day lunch, quick breakfast, or meatless dinner. this one's a keeper for sure.


caprese omelet with pesto
20 minutes, serves one if you're really hungry, two if you're not

2 eggs
splash whole milk or half & half
1/4 to 1/2 cup shredded mozzarella cheese
medium tomato
1/2 cup loosely packed basil
1 garlic clove, peeled
2 tablespoons almonds or pine nuts
about 2 tablespoons olive oil
  1. coat the bottom of a medium skillet with butter or non-stick spray and heat over medium-low heat.

  2. whisk the eggs and milk or half & half together. season well with salt and pepper.

  3. pour the eggs into the preheated pan and cook until cooked through.

  4. while the eggs are cooking, make the pesto. in the bowl of a food processor, add the basil and garlic clove. pulse a couple times until coarsely chopped. add about a tablespoon of olive oil and pulse again. add the nuts and pulse. with the processor running, stream in olive oil until the pesto is at the consistency you like.

  5. when the eggs are just set, remove from heat. add the mozzarella to half, top with the tomatoes, and cover the pan for a few minutes so the cheese melts. fold the omelet in half and serve with the pesto poured on top.

Rabu, 17 Agustus 2011

cherry almond jam

Posted By: Rynisma - 09.42
still drooling over last week's cherry almond snacking cakes? love the combination of cherries and almond as much as my aunt judy & i do? as promised, here is an amazingly delicious way to use up the last of your cherries and enjoy them the rest of the year.


cherry almond jam
adapted from ball blue book guide to canning
1 1/2 hours, makes about 8.5 pints

2 1/4 pounds sweet cherries, pitted (between 6 & 7 cups)
1 package powdered pectin
3/4 cup almond liqueur (i used amaretto)
3 tablespoons lemon juice
4 1/2 cups sugar
  1. prepare your water bath, jars and lids for canning. ball has a good intro to canning guide on their website if you're new to canning.

  2. place about half of the cherries in the bowl of a food processor. pulse until they're at the consistency you want. pour into a large nonreactive saucepan. repeat with the remaining half of the cherries.

  3. add the pectin, liqueur, and lemon juice to the cherries and bring to a boil, stirring frequently. 

  4. add the sugar and stir until dissolved. return to a rolling boil and boil hard for 1 minute, stirring constantly. remove from heat, skim foam, ladle hot jam into hot jars. adjust two piece caps and process 10 minutes in a boiling water canner.

Senin, 15 Agustus 2011

secret recipe club: whole wheat honey pancakes

Posted By: Rynisma - 04.00
i don't know what i was thinking when i chose these whole wheat honey pancakes from itzy's kitchen for my secret recipe club selection this month. don't get me wrong, it took me no time to make them and the flavor is great. no matter what i do, cooking pancakes is one thing i have yet to master. (and cooking rice, but that's another story all together. how come i can make ravioli from scratch, endless varieties of risotto, towering layer cakes, and jam with ease, but two simple things always defeat me?!) i thought i had mastered them last winter, and it wasn't until i was elbow deep in wheat flour and honey making these when i realized those carrot pancakes were made on my electric stove, which thankfully was kicked to the curb a couple months ago in exchange for gas. long story short, my heat and timing were all off and the first two batches were either burnt to a crisp or raw in the middle. luckily the last batch came out perfectly brown and cooked through.


and had i been able to cook the darn things, these pancakes make the perfect weekend breakfast. the wheat flour fills you up without being thick. we've all had bad diner pancakes that sit like a rock in our stomach. these are not those pancakes. they're the perfect breakfast to fuel an afternoon of weeding, lawn mowing, or spending the day lazing around.


i can't write about itzy's kitchen without sending a huge congratulations to erica and her husband josh. in the last month, she went from very pregnant to a new mom!


for more information on the secret recipe club, including the list of participating bloggers, featured recipes from members, and instructions on how to join, visit the all new secret recipe club website! due to overwhelming popularity of the src - and 139 participating bloggers - this month's posts are split into three groups. today is the first group's posting date. check the src website on august 22 and 29 for groups two and three's posts.


check out my previous src posts below

minted pineapple lime agua frescabreakfast tacos

simple almond sandwich cookies

roasted banana rum cake


whole wheat honey pancakes

adapted from itzy's kitchen

20 minutes, makes 10 pancakes


1 3/4 cups whole wheat flour

1 teaspoon baking powder

1/2 teaspoon baking soda

1/2 teaspoon salt

1/3 cup honey

2 egg whites

1 cup low fat buttermilk

1 tablespoon olive oil

1 teaspoon vanilla

up to 1/4 cup whole milk

  1. preheat your skillet on medium heat.


  2. in a large bowl, whisk the egg whites, buttermilk, and honey until well blended. add the flour, baking powder, baking soda, and salt and mix just until blended.


  3. mix in the olive oil and vanilla. add the milk about one tablespoon at a time until the mixture is thick but runny.


  4. coat your skillet with nonstick spray. pour about 1/4 cup batter per pancake. cook until lightly browned, about a minute on each slide. serve with real butter and maple syrup.


Minggu, 14 Agustus 2011

cherry brown butter bars

Posted By: Rynisma - 09.31
according to my cherry lady at the market, this week is the last of the cherries. bummer. this summer, more than ever, i've come to love perfectly red, ripe cherries. but you wouldn't know that, since cherries haven't really graced the pages of this blog much, have they? i better change that this week...you might want to stock up and get our your cherry pitter, because i have an unbelievable cherry jam coming up...

anyway, back to the bars. couple cherries with a crunchy shortbread crust and creamy brown butter filling and you've got the perfect end to a summer barbecue, or enchilada fest, as i would have it.


and while deb did a great job of lining her cherries up all pretty and perfect, i didn't. i tried and decided i didn't have the patience to line up rolling cherries and i wanted each bite to have a cherry. so i simply pitted a whole pound (maybe more?) and spread them out in a single layer onto the crust.

cherry brown butter bars
adapted from smitten kitchen
1 hour, makes 16 four-bite bars or 32 two-bite bars

while the shortbread crust and brown butter filling pairs perfect with sweet tart cherries, i bet this would be equally amazing with whole raspberries or fat peach slices. 

for the crust:
7 tablespoons unsalted butter
1/3 cup sugar
1/2 teaspoon vanilla extract
1 cup all purpose flour
1/4 teaspoon kosher salt

for the filling:
1/2 cup sugar
2 eggs, room temperature
1/4 teaspoon kosher salt
1/4 cup flour
1 teaspoon vanilla extract
1/2 cup unsalted butter
1 pound sweet cherries
  1. preheat your oven to 375F. line the bottom of an 8x8 inch baking pan with 2 sheets of parchment paper, so the edges hang over the side of the pan. (deb has a great photo of what it should look like here.)

  2. in a medium sauce pan, melt the butter. once melted, remove from heat, and mix the sugar and vanilla. add flour and salt and mix until incorporated.

  3. transfer the dough to your pan and use your fingers to press it evenly across the bottom of the pan. bake about 18 minutes, or until light golden brown.

  4. while the crust is cooking, pit your cherries and make the filling.

  5. start the filling by making brown butter. place the butter in a medium, light colored bottom saucepan and cook over medium heat. cook until the butter turns a light, nutty brown color. first it will foam up a lot, the foam will slowly die down, and the butter will start to brown. it's ready when almost all of the foam is gone, and the pan has a few tiny pieces of sandy looking burnt butter on the bottom. as soon as you see this, take it off the heat. this took me about five minutes. watch it very carefully the whole time, as butter will go from brown and nutty to burnt in a matter of seconds. pour the butter into a glass dish to cool while preparing the rest of the filling.

  6. right about now your crust should be ready. take it out of the oven, leave the oven on at 375F, and let the crust cool slightly while you finish the filling. 

  7. in a medium bowl, whisk the sugar, eggs, and salt. add the flour and vanilla and whisk until smooth. gradually whisk in the browned butter. adding it all at once will scramble the eggs, so be sure to add it about a tablespoon at a time. 

  8. pour your cherries in a single layer on the bottom of the crust. carefully pour the filling over the fruit, making sure it's evenly distributed. bake about 40 minutes, or until a toothpick comes out clean (be sure to prick the filling and not a cherry). cool completely in the pan on a rack.

  9. use the parchment paper to carefully remove the bars from the pan. cut into whatever size bars you'd like - i used my bread knife to avoid smushing the cherries - and serve.

Kamis, 11 Agustus 2011

black bean stuffed avocados

Posted By: Rynisma - 19.24
one of my favorite local restaurants is salenas, in village gate. jason always and i almost always get the flag - one chicken enchilada with white sauce, one pork enchilada with green tomatillo sauce and one beef enchilada with traditional red enchilada sauce - except for the last time, when i got the stuffed avocados. theirs were stuffed with spicy black beans, peppers, and onions, served with a side of beans and rice. i simplified mine a bit (and really, the recipe below isn't even really a recipe, but a suggestion) stuffing them with the same spicy black beans i often put in a taco or serve on the side and a simple pico de gallo. not only was the avocado creamy and delicious, but it got me thinking - what else could be stuffed inside?


stuffed avocados
20 minutes, serves 4 to 8

why the huge range in serving size? if you're serving these as the main course, without sides, figure one whole avocado per person. otherwise, half is plenty.

4 ripe avocados
one batch of spicy beans
one batch of pico de gallo
queso fresco
tortillas
  1. split your avocados in half & remove the pit. (simply recipes has a great tutorial if you've never done this before. you can score the avocado in the skin, just don't scoop it out or peel it.)

  2. fill each avocado with beans and top with pico de gallo. sprinkle the top with queso fresco and serve with warm tortillas.

Senin, 08 Agustus 2011

oatmeal cream pies

Posted By: Rynisma - 16.36
i classify almost all of my weekday baking as "stress induced" and "impulse baking." case in point, these oatmeal cream pies. some night last week (i think it was tuesday?) after a particularly long day at work and awork to do list with about six items on it and a home to do list with about right items - neither of them involving "do something fun, like bake cookies" - i had the urge to bake. i scrolled through the 124 cookie recipes i have saved in my google reader. chocolate chip? boring, at least for today. whoopie pies? peanut butter and chocolate? delicious! but oh they're too fussy and i'm in no mood for fuss. i needed a quick recipe with a high success rate; i'm in no mood for a failure. which brings me to these oatmeal cream pies. perfect. at 9:00 at night, while you're watching your favorite show, i'm mixing oatmeal and creaming marshmallow. and forty five minutes later i was licking the cookie & marshmallow cream bowls, assembling cookies.


as much as i freakin' love these cookies, i wasn't a huge little debbie fan. maybe it's because i bought my lunch at school and missed out on dessert in my lunch box. i don't remember my mom ever making oatmeal cookies, not that i'm complaining since we almost always had a homemade cookie in the cookie jar (except for the few times we had nutter butters or el fudge. do they still make those?).


i took half of these to work and they were scarfed up before lunch time. and jason. he turned his nose up at these before i even started cooking. oatmeal and marshmallow are two things the man does not like. (have you ever met someone that didn't like a s'more?!) while the second tray were in the oven, he came downstairs to smell what was baking. after one bite he was hooked. i will definitely make these again.


oatmeal cream pies
adapted from honey & jam

1 hour, makes 12 sandwich cookies


i used a 1 1/2 tablespoon disher to make these cookies and they were huge. two adults could share one, seriously. next time i'm cutting it down to one tablespoon or 2 teaspoons for a more manageable size. and sometimes i just want a sweet treat, not a cookie the size of my face.


for the cookies:

1 cup unsalted butter, room temperature

3/4 cup light brown sugar

1/2 cup granulated sugar

1 teaspoon vanilla extract

2 eggs, room temperature

1 1/2 cups flour

1/2 teaspoon salt

1 teaspoon baking soda

1/4 teaspoon cinnamon

1 tablespoon cocoa powder

1 1/2 cups oats


for the filling:

1/2 cup vegetable shortening

1 1/2 cups marshmallow cream

2 cups powdered sugar

1 teaspoon vanilla extract

1-2 tablespoons milk or water

  1. in a large bowl, cream the butter and sugars until light and fluffy. add the eggs, one at a time, and then the vanilla.
  2. whisk the flour, salt, baking soda, cocoa, cinnamon, and oats in a separate bowl. slowly add to the butter & sugar mixture until incorporated.
  3. preheat your oven to 350F and refrigerate the dough for about 15 minutes.
  4. line a baking sheet with parchment paper and drop dough, about a tablespoon at a time, on the cookie sheet, at least two inches apart.
  5. bake 10 to 12 minutes, or until the edges are starting to brown and the middle is still a bit soft.
  6. transfer to a wire rack and cool completely.
  7. while the cookies are cooling, make the filling. cream the shortening and marshmallow cream together. add the powdered sugar, about a half cup at a time until incorporated. if the mixture gets thick, add milk or water, about a tablespoon at a time until the desired consistency. mix in the vanilla.
  8. when the cookies are cool, match them up by size. use a knife or pastry bag and fill each cookie with cream. store in an airtight container. these will keep about five days.
check out more sweet treats at sweet tooth friday and sweets for a saturday!

Sabtu, 06 Agustus 2011

tomato basil risotto

Posted By: Rynisma - 16.14
this year my garden had a major overhaul. instead of trying to cram anything and everything in my two hundred square feet, i decided to focus on four things - romaine lettuce, cucumbers, green beans, and tomatoes. fourteen tomato plants to be exact. six romas, one glamour, one san marzano, six cherries, and one unknown my grandpa grew from seed (and so far is doing the best of the bunch - hopefully they all do much better this year than last). i picked my first tomato of the year this week and celebrated it with the perfect summer risotto. and since my basil has been going crazy for weeks, i couldn't help but stir some in at the end. i bet these would make out of this world risotto cakes.


tomato basil risotto

45 minutes, serves 4


4 tablespoons unsalted butter

few tablespoons olive oil

1 small onion, diced

4 garlic cloves, minced

1 cup arborio rice

4 cups chicken stock

4 medium sized roma tomatoes, diced (use more or less depending on the size of your tomatoes)

1/2 cup freshly grated parmesan cheese

1/4 cup freshly grated fontina cheese (optional)

handful of fresh basil, torn

  1. bring the stock to a simmer in a saucepan and keep hot.
  2. in a large saute pan or dutch oven, heat the butter and oil over low heat. saute the onions for about five minutes, until soft. add the garlic and cook another minute.
  3. add the arborio rice and cook, stirring frequently, until the rice is toasted, about three minutes.
  4. add about one cup of the hot stock to the rice and mix to coat. cook for a few minutes, stirring occasionally, until most of the liquid has been absorbed. continue adding about a cup of stock and cooking the rice until about two thirds of the stock has been incorporated. add the diced tomatoes and continue adding the stock and cooking until absorbed, until all the stock has been absorbed.
  5. mix in the parmesan and fontina cheeses and season with salt and pepper. tear the basil into the risotto and mix in right before serving.
check out more sweet & savory eats at recipe sharing monday!

Selasa, 02 Agustus 2011

cherry almond snacking cakes

Posted By: Rynisma - 18.55
i'm a sucker for books. and by books, i mean real books, with printed pages. i don't care what the research says, there's something about reading a real book that an ebook can't match. no way. and when i find a book i want to buy, i'm the one who reaches in the back of the stack - past at least four or five of the same book - to get a copy that no one else has opened. i want the new book smell. the crack of the spine when i open to read it. which brings me to borders, a week and a half ago, when their going out of business sales kicked off. and while we were waiting in line to check out, i noticed a huge sale sign in front of the magazines. needless to say i walked out with all the america's test kitchen special editions i could get my hands on. and promptly made these cakes the next day.

i'm also a sucker for sweet cherries, now easily going through two pounds a week (i'm not the only one who eats them over the garbage can). add almond to the mix and i'm sold. these are the perfect sweet treat to a summer meal. not too sweet, nice and light, and the ripe cherries cook up perfectly.

and now that i've had my first taste of a new york state peach, i can't wait for peach season to be completely and totally on. i have a feeling these cakes will show up again with peach and vanilla. and if you aren't a fan of cherries, the original recipe called for mixed berries and vanilla extract.

cherry almond snacking cakes
adapted from america's test kitchen cooking for two, 2011
45 minutes plus cooling time, makes 4-5 mini bundt cakes

1 cup flour
1 teaspoon baking powder
1/4 teaspoon salt
6 tablespoons unsalted butter, room temperature
1/2 cup sugar
2 eggs, room temperature
1/2 teaspoon almond extract
4 tablespoons whole milk, room temperature
1 cup ripe sweet cherries, pitted and halved
  1. preheat your oven to 350F. grease four one cup or five three quarters of a cup mini bundt pans.
  2. in a small bowl, whisk the flour, baking soda, and salt together. set aside.
  3. in a medium bowl, beat the butter and sugar until light and fluffy.
  4. beat in the egg and then almond extract until combined.
  5. beat in one third of the flour mixture and two tablespoons milk. repeat with another third of the flour mixture and two tablespoons of milk. add the last third of the flour mixture. fold in the cherries.
  6. divide the batter evenly between the prepared pans, filling them about three quarters full. smooth tops of the batter and bake until a toothpick comes out clean, about twenty minutes.
  7. let cakes cool in the pan about 10 minutes before inverting them onto a wire rack. cool completely before devouring.
check out more sweet treats at sweet tooth friday!

Copyright © 2013 Free Food Recipe 24 Hours™ is a registered trademark.

Designed by Templateism. Hosted on Blogger Platform.